Battery switch on travel trailer function is crucial for safe and efficient power management. Understanding how these switches work, the different types available, and their role in protecting your trailer’s electrical system is key to a smooth and enjoyable RV experience. This guide will walk you through everything you need to know, from basic operation to troubleshooting and maintenance.
We’ll cover various switch types, their wiring, advantages, and disadvantages. We’ll explore how the battery switch interacts with other power sources like solar panels and shore power, and provide step-by-step instructions for troubleshooting common problems. Safety is paramount, so we’ll also cover important precautions to take when working with your travel trailer’s electrical system.
Function of the Battery Switch
The battery switch in your travel trailer is a crucial component of its electrical system, acting as a central control for power flow. It allows you to selectively connect and disconnect your trailer’s battery from the rest of the electrical system, providing both convenience and critical protection. Understanding its function is key to maintaining your trailer’s electrical health and preventing potential damage.The primary function of the battery switch is to isolate the trailer’s battery from its electrical system.
This prevents unwanted current drain when the trailer is not in use, significantly extending battery life. Furthermore, it safeguards the electrical components themselves from potential damage caused by short circuits or accidental connections. By acting as a simple on/off switch, it provides a level of control and safety not otherwise available.
Battery Protection and System Integrity
The battery switch plays a vital role in protecting both the trailer’s battery and its electrical components. When the switch is turned off, it completely breaks the electrical connection between the battery and the rest of the system. This prevents parasitic drain, a slow but constant discharge that can eventually render your battery unusable. Moreover, in the event of a short circuit or malfunction within the trailer’s wiring, the switch can be used to quickly isolate the battery, preventing further damage and potentially avoiding a fire hazard.
Imagine a situation where a wire comes loose and shorts to ground: flipping the switch off immediately eliminates the power source, stopping the problem before it escalates.
Managing Power Sources: Tow Vehicle and Shore Power
The battery switch also facilitates the management of power from different sources. When connected to your tow vehicle, the switch allows the vehicle’s charging system to replenish the trailer’s battery. With the switch in the “on” position, the trailer’s battery is charged, ensuring sufficient power for lights, appliances, and other systems during travel. When parked and connected to shore power (hooked up to a campsite’s electrical supply), the switch’s role becomes even more critical.
So, you’re an audiophile who loves to travel? Awesome! First things first, check out this guide on creating the perfect audiophile travel setup to ensure your ears are happy on the go. Then, don’t forget to sort out your travel insurance – peace of mind is key! Getting Aon travel insurance is a smart move before you jet off, covering you for unexpected events.
That way, you can relax and enjoy your tunes wherever your adventures take you!
Shore power often charges the trailer battery through a dedicated charging system, and the switch ensures that this power is safely directed to the battery without causing conflicts with other power sources. A properly functioning battery switch prevents any backfeeding from the trailer’s system to the tow vehicle or shore power source.
Troubleshooting Battery Switch Issues
Dealing with a malfunctioning battery switch in your travel trailer can be frustrating, but systematic troubleshooting can often pinpoint the problem quickly. This section Artikels a step-by-step process to diagnose and resolve common battery switch issues. Remember safety first – always disconnect the battery’s negative terminal before working on the electrical system.
Battery switch problems usually stem from a few key areas: corrosion, loose connections, or a faulty switch itself. Corrosion builds up over time, especially in damp environments, increasing resistance and hindering current flow. Loose connections, often caused by vibration during travel, interrupt the circuit and prevent proper power transfer. A faulty switch may be internally damaged, rendering it unable to properly connect or disconnect the battery banks.
Identifying Common Problems
Common issues with travel trailer battery switches include corrosion on the terminals, loose or damaged wiring connections, and a failed switch mechanism. Corrosion manifests as a greenish or whitish buildup on the terminals and connectors, impeding electrical conductivity. Loose connections can be caused by vibrations during towing, leading to intermittent power or complete failure. A failed switch may simply refuse to operate correctly, remaining stuck in one position or failing to make a solid connection.
Regular inspection and preventative maintenance can significantly reduce the likelihood of these problems.
Step-by-Step Troubleshooting Procedure
A methodical approach to troubleshooting will quickly isolate the source of the problem. Start with the simplest checks and progressively move to more involved tests.
- Visual Inspection: Begin by carefully examining the battery switch and its connections. Look for any signs of corrosion, loose wires, or physical damage. Clean any corroded terminals with a wire brush and baking soda solution, ensuring thorough cleaning before proceeding.
- Connection Check: Tighten all connections, ensuring they are secure. Loose connections are a very common cause of battery switch malfunctions. If any wires appear damaged or frayed, replace them immediately.
- Switch Operation Check: Manually operate the switch several times, noting if it moves freely and clicks firmly into each position. If the switch feels stiff or binds, it may indicate internal damage requiring replacement.
- Voltage Measurement (Multimeter Required): Use a multimeter to check the voltage at various points in the circuit. This will help determine if the problem lies within the switch itself or elsewhere in the wiring.
Testing the Battery Switch with a Multimeter
Using a multimeter provides a precise way to diagnose battery switch functionality. This requires basic understanding of multimeter usage. Always ensure the multimeter is set to the appropriate voltage range (DC voltage) before taking any readings.
- Check Battery Voltage: With the switch OFF, measure the voltage directly across the battery terminals. This establishes the battery’s charge level. A reading significantly below the nominal voltage (e.g., 12V for a 12V battery) indicates a charging problem, not necessarily a switch issue.
- Check Voltage at Switch Terminals: With the switch in the ON position, measure the voltage at the switch’s output terminals. A voltage reading similar to the battery voltage indicates the switch is functioning correctly. A significantly lower reading points to a problem within the switch or its connections.
- Check Continuity (Switch OFF): Set your multimeter to the continuity setting (often represented by a diode symbol). Place the probes on the switch’s input and output terminals. There should be no continuity (an open circuit) with the switch OFF. A beep indicates a short circuit, suggesting a problem with the switch.
- Check Continuity (Switch ON): Repeat the continuity test with the switch in the ON position. There should be continuity (a closed circuit), indicated by a beep. The absence of a beep indicates an internal failure in the switch.
Battery Switch and Power Management: Battery Switch On Travel Trailer Function
Your battery switch is the central nervous system of your travel trailer’s power, acting as the main on/off switch for your house batteries. But it doesn’t work in isolation; it’s a key player in a larger power management system, interacting closely with other components to ensure efficient and safe power distribution. Understanding this interaction is crucial for maximizing your off-grid capabilities and preventing electrical problems.The battery switch plays a vital role in coordinating the flow of power between your batteries, solar panels, and inverter.
It determines which power sources are active and how they interact, preventing potentially damaging backfeeding or short circuits. This is especially important when using multiple power sources simultaneously. For instance, the switch allows you to isolate your house batteries from other systems while charging them from solar panels or shore power, preventing a drain on the batteries.
Solar Panel Integration
Solar panels generate DC power, and this needs to be routed to charge your house batteries. The battery switch ensures that this charging process occurs safely and efficiently. With the switch in the “on” position, the solar charge controller can send power to the batteries. Conversely, when the switch is “off,” the solar panels are disconnected from the batteries, preventing accidental discharge or potential backfeeding.
This safety feature is crucial for preventing damage to the solar panels or the batteries.
Inverter Interaction
Your inverter converts DC power from your batteries into AC power to run household appliances. The battery switch acts as a safety mechanism, allowing you to disconnect the batteries from the inverter when not in use. This prevents the inverter from draining your batteries unnecessarily and helps to extend their lifespan. When the switch is in the “on” position, the inverter can draw power from the batteries; when “off,” this pathway is cut, protecting your batteries.
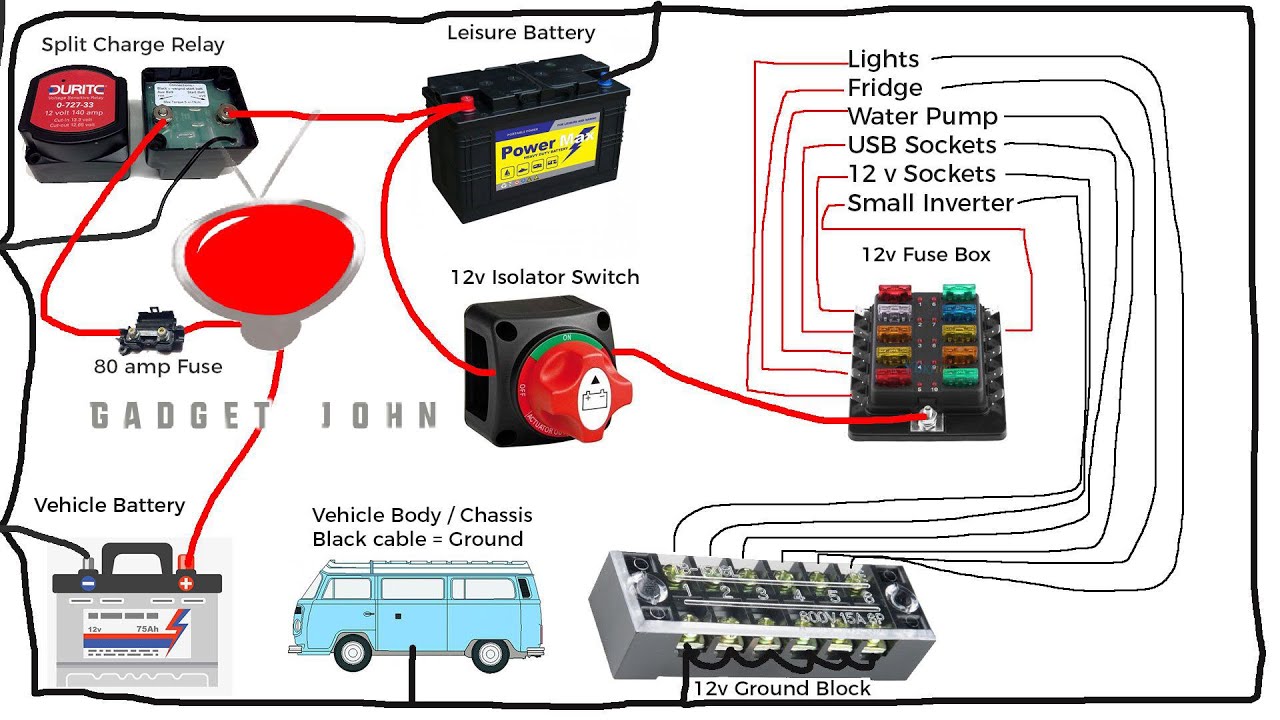
Simple Power Management System Diagram
The following table illustrates a simplified power management system. Note that this is a basic setup, and more complex systems may include additional components like a battery monitor, fuse box, and more sophisticated charge controllers.
So, you’re an audiophile who travels? Awesome! Check out this guide on creating the perfect audiophile travel setup to keep your ears happy on the go. It’s crucial to protect your investment, too, so don’t forget to sort out your travel insurance before you jet off. Getting Aon travel insurance is a smart move; you’ll have peace of mind knowing your gear is covered in case of loss or damage.
Happy listening, and safe travels!
| Component | Description | Connections |
|---|---|---|
| Solar Panels | Generate DC power from sunlight. | Solar Charge Controller |
| Solar Charge Controller | Regulates the flow of power from solar panels to batteries. | Solar Panels, Battery Switch (input), Batteries |
| Battery Switch | Controls the flow of power to and from the batteries. | Solar Charge Controller (input), Batteries, Inverter (output), other 12V loads |
| Batteries | Store DC power. | Solar Charge Controller, Battery Switch, Inverter |
| Inverter | Converts DC power from batteries to AC power. | Batteries (via Battery Switch), AC Outlets |
Battery Charging System Interaction
The battery switch is critical for managing the charging of your travel trailer batteries. It allows you to isolate the batteries from other systems while they’re being charged, preventing them from being drained simultaneously. For example, when charging from shore power, the converter charges the batteries. The battery switch ensures the converter’s charging current is directed solely to the batteries and not shunted to other loads.
Similarly, when charging via solar panels, the switch ensures the charge controller directs power only to the batteries, avoiding unintended power distribution. The switch effectively protects the charging system and extends the life of your batteries.
Safety Considerations with Battery Switches
Working with your travel trailer’s electrical system, especially the battery switch, requires careful attention to safety. Improper handling can lead to serious injury or damage to your equipment. Understanding the potential hazards and following established safety procedures is crucial for a safe and enjoyable RV experience.Understanding the risks involved is paramount before attempting any work on your travel trailer’s battery system.
Direct contact with the battery terminals, improper disconnection, or accidental short circuits can result in severe consequences. This section details essential safety measures to minimize these risks.
Potential Hazards of Incorrect Battery Switch Operation
Incorrect operation of the battery switch can lead to several hazards. These hazards range from minor inconveniences to potentially dangerous situations. Always treat your RV’s electrical system with respect and caution.
- Electrical Shock: Direct contact with battery terminals or exposed wires can result in a painful and potentially dangerous electrical shock. This is especially true if the battery is connected and the system is live.
- Battery Acid Burns: Battery acid is highly corrosive and can cause severe burns to skin and eyes. Always wear appropriate protective gear when working near batteries.
- Fire Hazard: Sparks from loose connections or accidental short circuits can ignite flammable materials in the vicinity of the battery. Ensure proper ventilation and keep the area clear of combustible materials.
- System Damage: Incorrect switching can damage sensitive electronic components within your RV, leading to costly repairs.
- Explosions: Hydrogen gas, produced during battery operation, is highly flammable and can explode if ignited. Proper ventilation is crucial to prevent this.
Proper Disconnection Procedure
Before performing any maintenance or repairs on your travel trailer’s electrical system, it is crucial to disconnect the battery switch properly. This prevents accidental short circuits and protects you from electrical hazards. The following steps illustrate the safe disconnection procedure:First, locate the battery switch. It’s usually located near the battery itself, often inside a compartment. Next, ensure all appliances and electronics within the travel trailer are turned off.
This prevents residual current flow and reduces the risk of electric shock. Then, using insulated gloves, firmly turn the battery switch to the “OFF” position. This will interrupt the electrical flow to the system. Finally, visually confirm that the switch is indeed in the “OFF” position. Take a moment to double-check; it’s better to be safe than sorry.
This illustrated procedure minimizes risks associated with working on your travel trailer’s electrical system.
Battery Switch Installation and Replacement
Replacing your travel trailer’s battery switch is a straightforward process if you’re comfortable working with basic electrical systems. This guide will walk you through the steps, ensuring a safe and effective installation. Remember to always disconnect the battery’s negative terminal before starting any electrical work.
Safely Disconnecting the Existing Battery Switch
Before you begin installation, you must safely disconnect the existing battery switch. This prevents accidental shorts and protects you from electrical shock. First, locate your battery switch. It’s typically near the battery itself, often in a compartment under the trailer. Next, using a wrench, carefully loosen the nuts securing the battery cables to the switch terminals.
It’s crucial to note which cable connects to which terminal (positive (+) and negative (-)) to ensure correct reconnection later. Once the cables are disconnected, visually inspect them for any damage. Replace damaged cables before proceeding. Always double-check that the cables are completely disconnected before touching any other parts of the system.
Installing a New Battery Switch
Once the old switch is removed, carefully clean the mounting area. This ensures a secure fit for the new switch. If your new switch requires different mounting hardware, install it according to the manufacturer’s instructions. The new switch should be mounted securely, preferably in the same location as the old one for ease of access. Ensure the mounting surface is clean and free from debris or corrosion.
Wiring a New Battery Switch, Battery switch on travel trailer function
The wiring procedure is critical for proper functionality and safety. Use appropriately sized wires for the amperage rating of your battery and charging system. Too small a wire can overheat and create a fire hazard. Consult the manufacturer’s specifications for your new battery switch to determine the correct wire gauge. Typically, heavier gauge wire (lower number) is needed for higher amperage.
After identifying the positive (+) and negative (-) terminals on your new switch, connect the battery cables accordingly. Tighten the connection nuts securely, ensuring a solid electrical contact. Avoid over-tightening, which can damage the terminals. Use appropriate wire connectors, such as ring terminals, to create clean and secure connections. Once the wires are connected, visually inspect them one more time to ensure that there are no loose wires or damaged insulation.
Mastering your travel trailer’s battery switch is a vital skill for any RV owner. By understanding its function, troubleshooting potential issues, and adhering to safety procedures, you’ll ensure reliable power and protect your investment. This guide has equipped you with the knowledge to confidently manage your trailer’s electrical system and enjoy worry-free adventures on the road.
FAQ Overview
What happens if I leave my battery switch on all the time?
Leaving your battery switch on constantly can drain your batteries, especially if you’re not connected to shore power or using solar. This can lead to a dead battery and potentially damage your electrical components.
How do I know if my battery switch is bad?
Signs of a bad battery switch include no power to appliances even with a charged battery, flickering lights, or a blown fuse. A multimeter can help test the switch’s continuity.
Can I install a battery switch myself?
While possible, installing a battery switch requires basic electrical knowledge and careful attention to safety. If unsure, consult a professional electrician.
What size wire should I use for my battery switch?
The appropriate wire size depends on the amperage of your battery and the switch. Consult the manufacturer’s specifications for your specific switch and battery.
